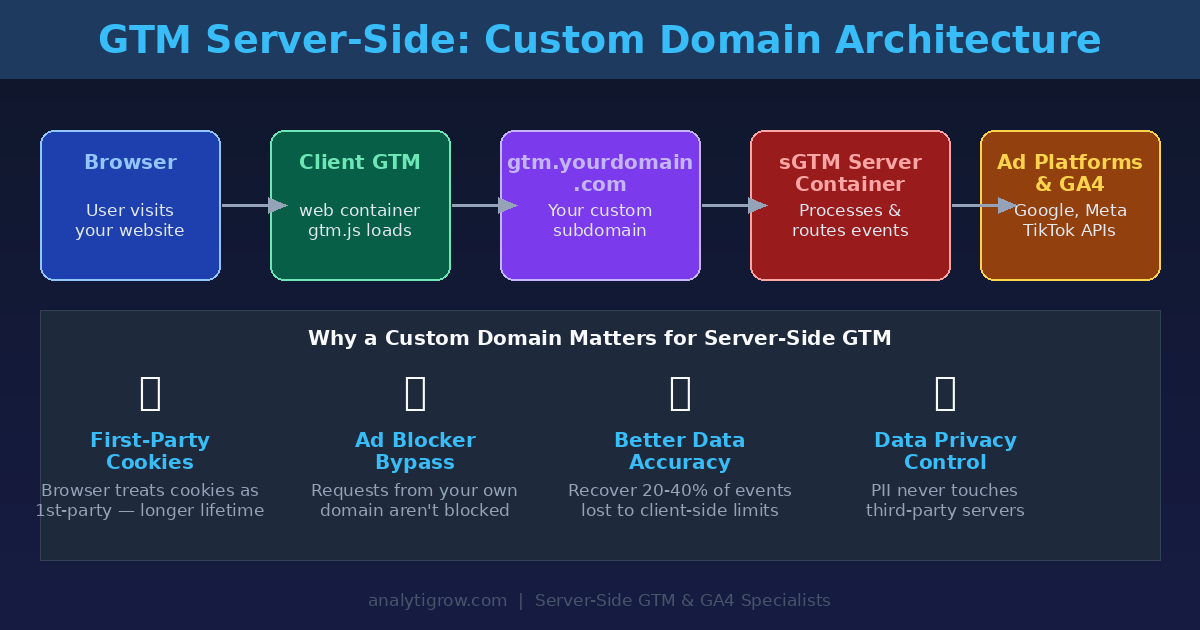
If you’ve set up a GTM server-side container, you’ve probably noticed a default URL like your-project.uc.r.appspot.com. That works — but it’s not good enough for production. Without a custom domain, your server-side tracking suffers from shorter cookie lifetimes, higher ad blocker block rates, and reduced data accuracy.
Setting up a custom subdomain like gtm.yourdomain.com is one of the highest-ROI steps you can take after deploying server-side GTM. It enables true first-party cookies, bypasses browser-based restrictions, and significantly improves your conversion tracking accuracy for Google Ads, Meta, and GA4.
In this step-by-step guide, you’ll learn exactly how to configure a custom domain for your GTM server-side container — from DNS records to verifying it works in GTM Preview Mode.
Why a Custom Domain Matters for Server-Side GTM
Before diving into the setup, it’s worth understanding what’s actually at stake. When you use the default App Engine or Cloud Run URL, browsers treat cookies set by that domain as third-party cookies — even though the data flows through your server. This matters for two reasons.
First, browsers like Safari use Intelligent Tracking Prevention (ITP) to aggressively expire cookies set by JavaScript on third-party domains — sometimes within 24 hours. Your _ga cookie, supposed to persist for 2 years, may be wiped before a user returns for their second visit.
Second, ad blockers and privacy extensions use block lists to flag known tracking domains. The default Google App Engine URLs are on many of these lists. Requests to *.uc.r.appspot.com are routinely blocked, meaning you lose event data before it reaches your server.
A custom subdomain on your own domain fixes both problems. The browser sees requests to gtm.yourdomain.com as first-party, cookies get the full 2-year lifespan, and ad blockers can’t easily identify and block the endpoint without also breaking your website. Typical data accuracy improvement: 15–35% more events captured after switching.
Prerequisites
Before you start, make sure you have a working GTM server-side container deployed on Google App Engine, Cloud Run, or a managed host like Stape.io; access to your domain’s DNS settings via Cloudflare, GoDaddy, Route 53, or your registrar; admin access to Google Tag Manager to update container settings; and SSL/HTTPS capability — either via your hosting provider or Cloudflare’s free plan.
Step 1: Choose Your Custom Subdomain
Pick a subdomain that will point to your sGTM server. Good choices include gtm.yourdomain.com, analytics.yourdomain.com, metrics.yourdomain.com, or t.yourdomain.com. Avoid names like tracking or tag — these are commonly found on ad blocker block lists. Something neutral like metrics or data is less likely to be targeted.
Step 2: Add a CNAME Record in Your DNS
Log into your DNS provider and create a new CNAME record pointing your chosen subdomain to your sGTM server’s default URL:
Type:  CNAME
Name:  gtm   (or your chosen subdomain)
Value: your-project.uc.r.appspot.com
TTL:   3600 (or Auto)
If using Cloudflare: Set proxy status to DNS only (grey cloud) initially — this lets SSL provisioning complete cleanly. If using AWS Route 53: Use a CNAME for App Engine or an A record alias for Cloud Run. DNS changes typically propagate within 5–30 minutes; check propagation at dnschecker.org.
Step 3: Provision SSL for Your Custom Domain
HTTPS is required — browsers block mixed-content requests and first-party cookies only work over secure connections. How you provision SSL depends on your platform:
Google App Engine: Go to Cloud Console → App Engine → Settings → Custom Domains, click Add a custom domain, enter your subdomain, and Google automatically provisions a managed SSL certificate within 15–60 minutes.
Stape.io: In your Stape dashboard, go to container settings → Custom Domain, enter your subdomain, and Stape provisions SSL automatically once the DNS record is verified.
Cloud Run with Cloudflare: Enable the orange cloud proxy in Cloudflare — SSL is handled automatically with no additional configuration. Ensure your Cloud Run service allows unauthenticated requests on port 443.
Step 4: Add the Custom Domain in GTM Container Settings
Once DNS is propagated and SSL is active, register your custom domain in GTM itself. Open Google Tag Manager, select your server container, click Admin → Container Settings, find the Server Container URLs field, and add https://gtm.yourdomain.com. Keep the original App Engine URL as a fallback during testing — GTM uses the first URL as primary, so put your custom domain first once you’ve confirmed it works.
Step 5: Update Your GA4 Tag in the Web Container
Adding the domain in GTM settings is not enough — you also need to tell your web-side GA4 tag to route requests through the new endpoint. Open your GTM web container, find your GA4 Configuration tag, and under Fields to Set add two fields: transport_url with value https://gtm.yourdomain.com, and first_party_collection set to true. Save and publish. Without this step, GA4 still sends hits directly to Google’s servers, completely bypassing your custom domain.
For an even more complete setup, update the GTM loader script URL in your website’s source code so that even the GTM JavaScript itself is loaded from your custom domain — making it invisible to ad blockers that target googletagmanager.com:
// In your GTM snippet, change the script source from:
'https://www.googletagmanager.com/gtm.js?id='
// To:
'https://gtm.yourdomain.com/gtm.js?id='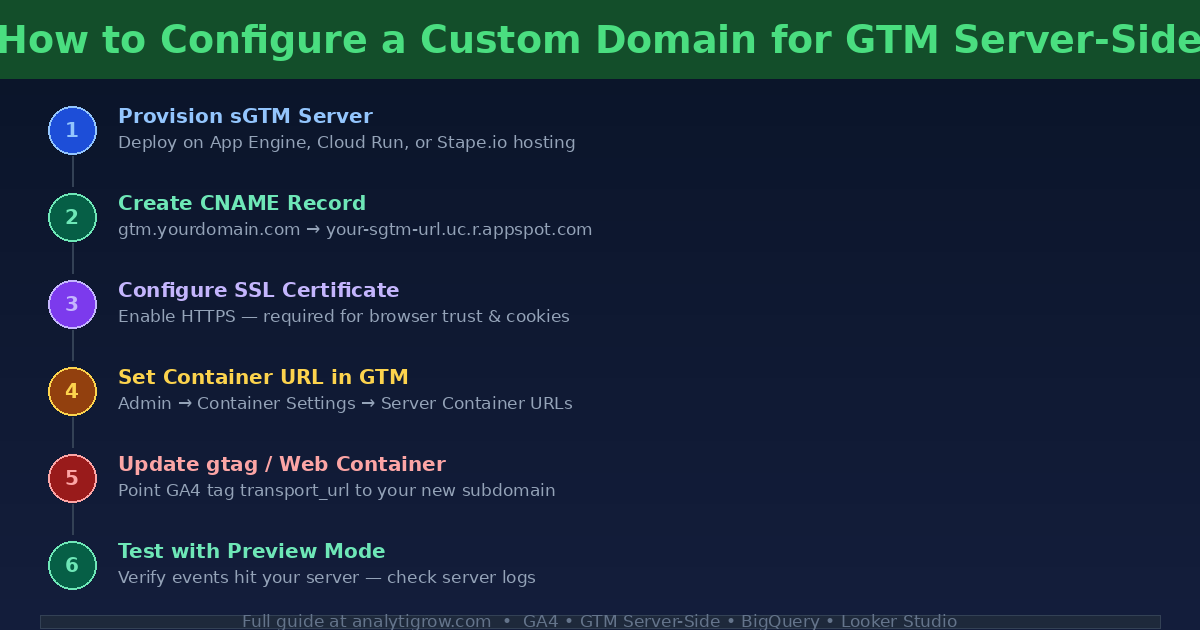
Step 6: Test in GTM Preview Mode
In your GTM server container, click Preview, enter your website URL, and browse to trigger a few events. In the Preview panel, check the Request column — the URL should show gtm.yourdomain.com, not the App Engine URL. Confirm events are firing correctly in the Tags tab.
If events aren’t showing up, check: DNS not yet propagated (wait 30 minutes and use dnschecker.org); SSL certificate not yet active (browser blocks HTTP requests); transport_url not set on the GA4 tag; or CORS errors in the browser console (your sGTM server may need to whitelist your domain).
Verifying First-Party Cookie Behaviour
After setup, open Chrome DevTools → Application → Cookies → your domain. Look for the _ga cookie. You should see the domain set to .yourdomain.com (not a third-party domain) and an expiry ~2 years from now. If that’s what you see, your custom domain is correctly issuing first-party cookies and you’re getting the full benefit of the setup.
Extending Your Stack: Meta CAPI and Google Ads
With your custom domain in place, you now have a reliable foundation for routing ad platform events server-side. The two highest-value integrations to add next are the Meta Conversions API (CAPI) — which sends Purchase, Lead, and other events directly from your server to Meta, bypassing iOS 14+ restrictions — and Google Ads Enhanced Conversions, which sends hashed customer data for improved conversion matching. Both integrations work significantly better when fbp, fbc, and _ga cookies have first-party status, which your custom domain now provides.
Once server-side events are flowing reliably, you can also link your sGTM container directly to BigQuery to write raw event data for long-term retention and custom analysis, then connect BigQuery to Looker Studio for unified dashboards that combine tracking data with CRM records and ad spend.
Common Mistakes to Avoid
Choosing a descriptive subdomain: Names like tracking or gtag are frequently added to browser extension block lists. Use something neutral. Forgetting to update the web container: Without adding transport_url to your GA4 tag, your site keeps sending hits to Google’s default endpoint and your custom server sees nothing. Enabling Cloudflare proxy too early: Wait until SSL is provisioned and events are confirmed flowing before turning on the orange cloud — some Cloudflare settings can interfere with sGTM request handling.
Conclusion
A custom domain for your GTM server-side container is not a nice-to-have — it’s a necessary step for any production tracking implementation. Without it, cookies expire too quickly, ad blockers intercept requests, and your conversion data is less accurate than it should be. The setup takes less than an hour, and the improvement in data quality is immediate and measurable across GA4, Google Ads, and Meta.
Need help setting up server-side GTM or configuring a custom domain for your tracking stack? The team at Analytigrow specialises in server-side implementations, GA4 migrations, and first-party data infrastructure. Get in touch — we’ll have your tracking firing accurately within days.